Quick answer: Count the bags on the truck. Take the square root. Probe that many bags, picked from all over the load, not just the back. A 400 bag truck? About 20 bags. Tip everything onto one sheet, mix it properly, and cut it down by coning and quartering till you’re left with roughly a kilo for the lab. Keep a sealed twin of it as your retention sample. And if it’s aflatoxin testing, take more draws and a bigger sample, since the toxin sits in pockets.
Ask any QC head who’s been at it a few years and they’ll tell you the same thing. Most “bad lab results” aren’t bad lab results at all. The lab tested exactly what it was given. It’s just that what it was given came from the three bags closest to the tailgate.
So this post isn’t about testing. It’s about the bit before testing, the bit everyone rushes. Think of it as a ready intake SOP for your team. There’s a checklist at the bottom you can print and stick up near the weighbridge.
Why does sampling matter more than testing?
Raw material is never as even as the invoice makes it look.
Bags at the bottom of a stack can be wetter than the ones on top. One truck can carry two different production batches. Mould, when it’s there, grows in patches. Put all that together and a careless sample can give you a perfectly accurate report about the wrong material.
If you want to know what to test for, our guide to cattle feed raw materials and quality standards covers it. Here we’re just making sure the stuff going to the lab deserves to be tested.
What equipment does an intake QC team need?
Very little, really. A bag trier for bagged loads. A double tube probe, something like one and a half to two metres long, if loose trucks come in. A clean plastic sheet or a steel tray to mix on, a flat scoop, some airtight pouches, seals, labels and your intake register.
Put it all in one box and leave it at the unloading bay. Sounds obvious. But if the probe lives in the lab and the pouches live in the office, guess which steps quietly get skipped on a busy day.
How many bags should be sampled from a truck?
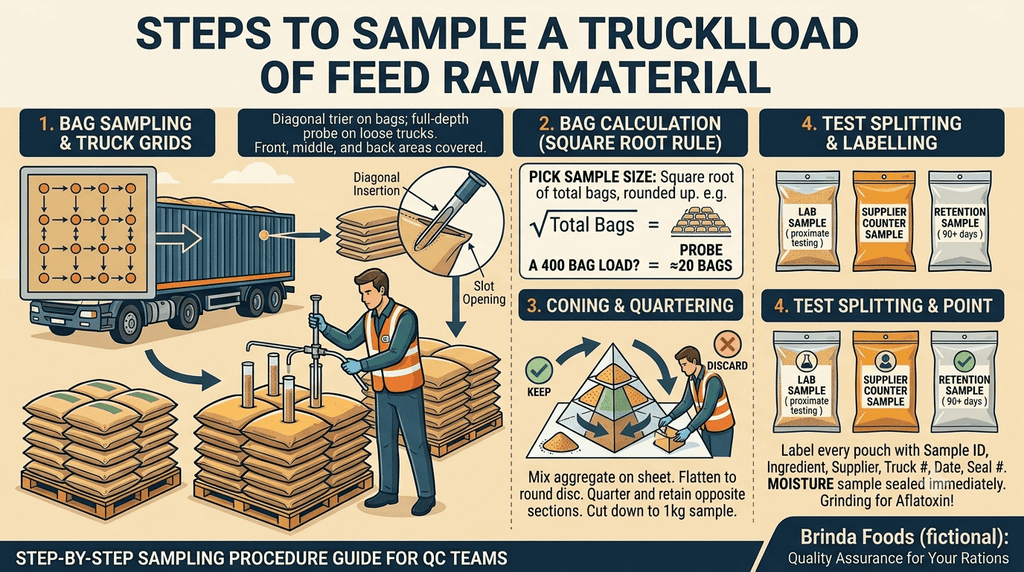
Most mills go with the square root of the number of bags, rounded up.
| Truck load (50 kg bags) | Number of bags | Bags to sample |
| 10 tonnes | 200 | 15 |
| 15 tonnes | 300 | 18 |
| 20 tonnes | 400 | 20 |
| 25 tonnes | 500 | 23 |
Getting the number right is the easy part. Where those bags come from is what actually decides whether your sample means anything. You want some from the front, some from the middle, some from the back, and from the top, middle and bottom of the stack too.
The simplest trick? Sample while the truck’s being unloaded. If you need 20 out of 400, just probe every 20th bag that comes off. No one climbs anything, and the spread takes care of itself.
What you really want to avoid is the tailgate habit. Those bags have had the most sun, rain and rough handling of the whole trip. They’re about the least typical bags you could pick.
How is a sampling probe used on bags and loose loads?
For bags, go in at a diagonal. Start near one top corner and aim for the opposite bottom corner, slot facing down. Twist, then pull out with the slot facing up so you don’t lose half of it on the floor. One draw like that gets you material from top to bottom of the bag. Thumb the weave back over the hole and you’re done.
Loose loads, say bulk maize, are a little different. Push the double tube probe in closed, at a slight angle, right down to the floor of the truck. Open it, give it a little shake so it fills, close it, pull it out. On a small truck that’s at least five spots: the four corners and the middle. Bigger trucks, eight to ten, spread down the length. Always all the way down. Fines and moisture love the bottom.
While you’re at it, use your nose. Seriously. A musty smell, a damp patch, caked lumps, insects, a colour that’s a bit off. If one bag clearly isn’t like the others, keep its sample separate and write down which bag it was. Throwing it into the main pile only hides the problem.
What are coning and quartering?
A whole truck can leave you with 5 to 10 kg of composite. Way too much for the lab. Coning and quartering is just a fair way of making it smaller.
Mix the heap first by lifting opposite corners of the sheet, back and forth a few times. Pour it into a cone. Flatten the cone into a round, even disc. Cut it into four. Keep two quarters that sit opposite each other, push the other two aside, mix, and go again. Stop once you’re at the size you need.
Got a lot of trucks coming in every day? A riffle divider does the same thing in a fraction of the time. Worth buying.
How big should the lab sample be?
For routine proximate work (moisture, protein, fat, fibre, ash, AIA), half a kilo to a kilo is more than enough. Split the final portion three ways. One goes to the lab. One stays with you as the retention sample. The third is a counter sample for the supplier, if your contract has room for joint checks.
Little tip that saves a lot of back and forth later: seal the moisture sample right away. An open tray sitting in the bay for an hour can shift a moisture reading enough to start an argument.
Once the results land, our explainer on how to read a feed lab report walks through every line. And if you’re comparing two lots with different moisture, read up on as-fed vs dry matter basis first.
Why does aflatoxin testing need a larger sample?
Because aflatoxin doesn’t play fair.
Protein and moisture are fairly spread out through a load. Aflatoxin isn’t. A small cluster of mouldy kernels, or one damp corner of cake, can hold most of the toxin in the truck. A small sample might miss it entirely. Or it might land smack on it and make the whole load look far worse than it is.
So for aflatoxin testing, roughly double your probe points. Build up something like 2 to 5 kg (closer to 5 for coarse grain, less for fine meal). Then grind all of it before anyone takes out a test portion. Grinding spreads those contaminated bits through the whole sample, which is exactly what you want.
This is most important for maize and maize based ingredients like Maize DDGS, which keep showing up in Indian surveillance data during the humid months. Our monsoon mycotoxin and aflatoxin guide goes into why, and what the current BIS rules say.
Should sampling differ by ingredient?
Not the method. Just what you keep an eye on.
Soya DOC and Mustard DOC can have lumps or dark, overcooked bits, and the fines settle low, so go deep. De-oiled rice bran is usually where sand gives itself away; if a bag feels gritty between your fingers, sample it on its own. With Rice DDGS and maize DDGS, watch the colour as bags come off. Big shifts can mean more than one drying batch on the same truck. Maize gluten is fine and picks up moisture quickly, so don’t leave its sample lying around.
How long should retention samples be kept?
Until all the feed made from that lot has been sold and eaten, and then a bit longer. A lot of mills simply say 90 days minimum, and hang on to dairy feed ingredients or expensive lots for longer.
Keep them cool, dry and safe from rats, and line them up by date so clearing old ones is easy. When a supplier or customer raises a quality question months later, a properly sealed retention sample settles it quickly and calmly. Both sides retest the same material. Done.
The main stock needs care too, of course. Our guide on storing DDGS, Soya DOC and DORB without spoilage has the details.
What should a sample label include?
Enough that someone who wasn’t there can trace it. Sample ID, ingredient and grade, supplier, invoice or challan number, truck number, date and time it arrived, how many bags were on it and how many you sampled, seal number, who took the sample (with a signature), and what it’s for: routine, aflatoxin, retention or counter.
Then note that ID next to the supplier’s Certificate of Analysis in your register. Now the two can be checked against each other any time.
Where does sampling fit in the intake flow?
After the weighbridge, while unloading, before anything goes into your stock. That timing matters. If a lot gets rejected, it hasn’t already been mixed in with the good stuff.
If trucks tend to pile up at your gate, it’s worth looking at turnaround as well. We talk about that in our piece on bulk feed raw material transport and logistics.
Printable intake sampling checklist
☐ Kit ready at the bay
☐ Bags counted, square root worked out (round up)
☐ Bags picked from front, middle, back and all layers
☐ Diagonal trier on bags, full depth probe on loose loads
☐ Odd bags sampled and noted separately
☐ Composite mixed well
☐ Reduced by coning and quartering
☐ Moisture sample sealed straight away
☐ Aflatoxin: double draws, whole aggregate ground
☐ Lab, retention and counter samples split
☐ Every pouch labelled and sealed
☐ Logged against invoice and COA
☐ Retention samples kept 90 days or more
Frequently asked questions
- How many bags should be sampled from a truck of feed raw material?
The square root of the total, rounded up, picked from right across the load. For a 20 tonne truck of 50 kg bags, that works out to about 20. - Can I just take a handful from the top of a few bags?
You can, but it won’t tell you much. The top layer has had the roughest ride. One diagonal draw through each chosen bag is far more useful. - What’s the difference between a lab sample and a retention sample?
One gets tested. The other is its sealed twin, kept back at the mill in case anyone wants a retest later. - How much sample does the lab need for aflatoxin?
More than for routine tests. Around 2 to 5 kg from extra probe points, all of it ground before the test portion is taken out. - Who should do the sampling?
Someone trained from your QC team, doing it the same way every time. A good method used differently on each shift isn’t much of a method. - Does Brinda Foods allow joint sampling at delivery?
Yes. Bring it up when you place your order and we’ll work it out together. You can start through our enquiry page.